


 雷达卡
雷达卡


当使用单机运行 PyTorch 模型进行推理时,处理小规模数据通常不会遇到问题。然而,一旦数据量上升至万级甚至百万级,系统瓶颈便迅速显现:内存不足、GPU 利用率低下、I/O 成为性能拖累,更不用说容错机制和多机扩展的需求了。
传统解决方案往往需要手动实现多线程 DataLoader、管理批次队列、调度 GPU 资源等,这类工程任务不仅繁琐,调试成本也较高。而 Ray Data 提供了一种轻量化的替代路径——在几乎不修改原有 PyTorch 代码的前提下,将本地推理流程无缝升级为分布式 pipeline。
典型的 PyTorch 推理流程
一个常见的推理过程包括模型加载、输入预处理以及批量预测,基本结构如下所示:
import torch
import torchvision
from PIL import Image
from typing import List

class TorchPredictor:
    def __init__(self, model: torchvision.models, weights: torchvision.models):
        self.weights = weights
        self.model = model(weights=weights)
        self.model.eval()
        self.transform = weights.transforms()
        self.device = 'cuda' if torch.cuda.is_available() else 'cpu'
        self.model.to(self.device)
    def predict_batch(self, batch: List[Image.Image]) -> torch.Tensor:
        with torch.inference_mode():
            batch = torch.stack([
                self.transform(img.convert("RGB")) for img in batch
            ]).to(self.device)
            logits = self.model(batch)
            probs = torch.nn.functional.softmax(logits, dim=1)
             return probs
对于少量图像(如几张图)的处理,这套流程完全可行:
predictor = TorchPredictor(
    torchvision.models.resnet152,
    torchvision.models.ResNet152_Weights.DEFAULT
)

images = [
    Image.open('/content/corn.png').convert("RGB"),
    Image.open('/content/corn.png').convert("RGB")
]
 predictions = predictor.predict_batch(images)
面对大规模数据的挑战
当图像数量从几张激增至几万乃至几百万张时,情况发生根本性变化:
- 内存无法容纳全部数据,无法一次性加载;
- GPU 利用率难以提升,尤其在多卡环境下吞吐优化困难;
- 任务中途失败如何恢复?是否支持集群部署?
- 常被忽视的是,数据加载阶段的 I/O 往往才是真正的性能瓶颈。
若要从零构建一套稳定可靠的分布式处理流程,至少需要数天开发与调优时间。
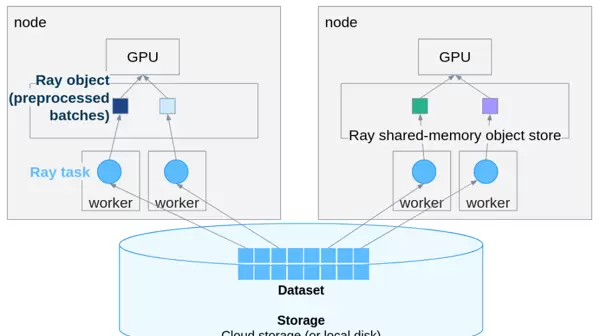
Ray Data 的解决思路
Ray Data 是一个专为分布式场景设计的数据处理框架,与 PyTorch 高度兼容。其最大优势在于极低的改造成本,原始代码几乎无需重构即可实现扩展。
第一步:调整 Predictor 类
将原有的处理方法进行适配:
predict_batch替换为:
__call__主要改动点包括:
- 方法签名变更,输入由 PIL Image 列表改为包含 numpy 数组的字典;
- 类型从
转换为List[Image.Image]
;Dict[str, np.ndarray] - 在方法内部将 numpy 数组重新转换为 PIL Image 进行推理;
- 输出格式统一为 dict;
- 确保结果返回 CPU(跨进程传输由 Ray 自动管理)。
值得注意的是,Ray Data 使用 numpy 数组而非 PIL Image,因其序列化效率更高,更适合跨进程通信。
import numpy as np
from typing import Dict

class TorchPredictor:
    def __init__(self, model: torchvision.models, weights: torchvision.models):
        self.weights = weights
        self.model = model(weights=weights)
        self.model.eval()
        self.transform = weights.transforms()
        self.device = 'cuda' if torch.cuda.is_available() else 'cpu'
        self.model.to(self.device)
    def __call__(self, batch: Dict[str, np.ndarray]):
        """Ray Data passes a dict batch with numpy arrays."""
        # Convert numpy arrays back to PIL Images
        images = [Image.fromarray(img_array) for img_array in batch["image"]]
        with torch.inference_mode():
            tensor_batch = torch.stack([
                self.transform(img.convert("RGB")) for img in images
            ]).to(self.device)
            logits = self.model(tensor_batch)
            probs = torch.nn.functional.softmax(logits, dim=1)

            # Get top prediction
            top_probs, top_indices = torch.max(probs, dim=1)
        return {
            "predicted_class_idx": top_indices.cpu().numpy(),
            "confidence": top_probs.cpu().numpy()
         }
第二步:创建 Ray Dataset
根据实际数据规模选择合适的数据集构建方式:
小规模数据:可直接从内存构建:
import ray
import numpy as np

ray.init()

# Convert PIL Images to numpy arrays
images = [
    Image.open("/path/to/image1.png").convert("RGB"),
    Image.open("/path/to/image2.png").convert("RGB")
]

# Create Ray Dataset from numpy arrays
ds = ray.data.from_items([{"image": np.array(img)} for img in images])中等规模数据:建议通过文件路径延迟加载,减少初始内存压力:
# Create dataset from paths
image_paths = ["/path/to/img1.png", "/path/to/img2.png"]
ds_paths = ray.data.from_items([{"path": path} for path in image_paths])

# Load images lazily
def load_image(batch):
    images = [np.array(Image.open(path).convert("RGB")) for path in batch["path"]]
    return {"image": images}

ds = ds_paths.map_batches(load_image, batch_size=10)生产环境推荐方案:使用
read_images()# Most efficient - Ray handles everything
ds = ray.data.read_images("/path/to/image/directory/")
# or with specific files
ds = ray.data.read_images(["/path/img1.png", "/path/img2.png"])第三步:执行分布式推理
核心代码极为简洁:
weights = torchvision.models.ResNet152_Weights.DEFAULT

# Distributed batch inference
results_ds = ds.map_batches(
    TorchPredictor,
    fn_constructor_args=(torchvision.models.resnet152, weights),
    batch_size=32,
    num_gpus=1,
    compute=ray.data.ActorPoolStrategy(size=4)  # 4 parallel actors
)
# Collect results
results = results_ds.take_all()
# Process results
for result in results:
    class_idx = result['predicted_class_idx']
    confidence = result['confidence']
     print(f"Predicted: {weights.meta['categories'][class_idx]} ({confidence:.2%})")
注意:在新版 Ray 中,
concurrencycompute=ActorPoolStrategy(size=N)该方案带来的关键改进包括:
- 自动分批处理,Ray 动态决定最优 batch size;
- 分布式并行执行,多个 worker 同时工作;
- GPU 资源自动调度,worker 按需分配显卡;
- 流式数据流动,避免全量数据一次性载入内存;
- 内置容错机制,worker 故障后自动重试。
生产级能力支持
Ray 支持直接读取云存储中的数据,兼容 S3、GCS、Azure Blob 等主流对象存储服务:
# Read directly from S3, GCS, or Azure Blob
ds = ray.data.read_images("s3://my-bucket/images/")

results = ds.map_batches(
    predictor,
    batch_size=64,
    num_gpus=1,
    concurrency=8  # 8 parallel GPU workers
 )
同一套代码可在不同规模集群中运行,无论是 10 台还是 100 台机器,均无需修改逻辑:
# Connect to your Ray cluster
ray.init("ray://my-cluster-head:10001")

# Same code as before
ds = ray.data.read_images("s3://my-bucket/million-images/")
results = ds.map_batches(predictor, batch_size=64, num_gpus=1)
进阶优化技巧
为避免每个 batch 都重复加载模型带来的资源浪费,可采用 ActorPoolStrategy 使模型实例常驻内存:
from ray.data import ActorPoolStrategy

results = ds.map_batches(
    TorchPredictor,
    fn_constructor_args=(torchvision.models.resnet152, weights),
    batch_size=32,
    num_gpus=1,
    compute=ActorPoolStrategy(size=4)  # Keep 4 actors alive
)
此举显著提升整体吞吐性能。
此外,CPU 与 GPU 资源可精细化配置:
results = ds.map_batches(
    TorchPredictor,
    fn_constructor_args=(torchvision.models.resnet152, weights),
    batch_size=32,
    num_gpus=1,  # 1 GPU per actor
    num_cpus=4,  # 4 CPUs per GPU worker
    compute=ActorPoolStrategy(size=8)
)
推理完成后结果可直接写回云存储:
results.write_parquet("s3://my-bucket/predictions/")常见使用陷阱提醒
以下是用户容易忽略的问题:
- Ray Data 不支持直接序列化 PIL Image 对象,必须先转为 numpy 数组:
# ? This will fail
ds = ray.data.from_items([{"image": pil_image}])

# ? This works
ds = ray.data.from_items([{"image": np.array(pil_image)}])

# ? Or use read_images() (best)
ds = ray.data.read_images("/path/to/images/")- 自 Ray 2.51 版本起,
已失效:concurrency
# ? Deprecated
ds.map_batches(predictor, concurrency=4)

# ? New way
ds.map_batches(predictor, compute=ActorPoolStrategy(size=4))- batch size 设置过大易引发 OOM,建议从小值开始逐步测试:
# Monitor GPU memory and adjust batch_size accordingly
results = ds.map_batches(
    predictor,
    batch_size=16,  # Start conservative
    num_gpus=1
)
实践建议
- batch size 应循序渐进调整,结合 GPU 显存占用情况进行观察:
# Too small: underutilized GPU
batch_size=4

# Too large: OOM errors
batch_size=256

# Just right: depends on your model and GPU
# For ResNet152 on a single GPU, 32-64 works well
batch_size=32- 使用 ActorPoolStrategy 处理 20 张图像约耗时 9.7 秒,而原生 PyTorch 处理 2 张图几乎瞬时完成。因此,在图像数量较少时,Ray Data 的启动开销反而不利。该方案更适合几百到上千张图像以上的场景。
- Ray 内置 dashboard,默认监听 8265 端口,便于监控任务状态:
# Check Ray dashboard at http://localhost:8265
ray.init(dashboard_host="0.0.0.0")- 在代码中添加 try-except 包裹,防止单个样本错误导致整个任务中断:
def safe_predictor(batch: dict):
    try:
        return predictor(batch)
    except Exception as e:
return {"error": str(e), "probs": None}- 任务前加入计时逻辑,有助于性能 profiling 分析:
import time

start = time.time()
results = ds.map_batches(predictor, batch_size=32)
results.take_all()
print(f"Processed in {time.time() - start:.2f} seconds")
适用场景总结
推荐使用 Ray Data 的情况:
- 数据集过大,无法完整放入内存;
- 需要利用多 GPU 或多机器并行加速;
- 长期运行任务需具备容错能力;
- 希望避免自行编写复杂的分布式逻辑。
无需引入 Ray Data 的情况:
- 图像数量在百张以内;
- 数据可轻松加载至内存;
- 仅使用单张 GPU 且无近期扩展计划。
总体而言,Ray Data 的核心价值在于迁移成本极低。只需微调 PyTorch 方法签名,并将数据封装为 Ray Dataset,即可获得多机扩展能力、自动 batching、并行优化、容错机制及云存储无缝集成等多项高级特性。
在你准备实现多线程数据加载器或手动管理 GPU 资源池之前,不妨先了解一下这种方法:将分布式系统中的复杂任务交给 Ray 来处理。这样可以让你更专注于模型的构建,而不是被底层的工程细节所困扰。
通过使用 Ray,你可以将诸如任务调度、资源分配和容错处理等繁琐工作自动化,从而大幅提升开发效率,并减少出错的可能性。这样一来,你的主要精力就可以集中在算法设计与性能优化上,而不必深陷于系统层面的实现细节中。
尤其是在需要扩展到多个设备或多台机器的场景下,Ray 提供了简洁而强大的抽象机制,使得并行化和分布式训练变得更加直观和易于维护。因此,在动手自研底层框架前,评估一下是否可以直接借助 Ray 实现相同目标,可能会为你节省大量时间和精力。

 京公网安备 11010802022788号


