


 雷达卡
雷达卡


进行本实验前,需掌握以下技能:
- 熟悉Linux操作系统的运维操作,能够熟练运用常见的Linux命令,如top、iostat等;
- 具备GaussDB数据库的使用经验,能够理解并分析其执行计划;
- 掌握GaussDB中SQL语句的优化策略与方法。
实验环境搭建步骤
- 确认sysbench等压力测试工具已正确安装并可正常使用。
- 在GaussDB中创建用于压测的专用用户,供后续sysbench调用。
- 验证该sysbench用户是否具备正常登录数据库的能力。
- 创建本次测试所需的独立数据库实例。
- 执行数据初始化操作,准备基础测试数据集。
- 若初始化失败,参考以下处理方式:
[root@gs01 lib64]# sysbench --version
sysbench 1.0.17-71abd99
[root@gs01 lib64]#gsql -d postgres -p 8000 -r
create user sysbench with sysadmin password 'Huawei@1234';[Ruby@gs01 cm_agent]$ gsql -d postgres -p 8000 -U sysbench -W Huawei@1234 -h 192.168.3.60 -r
gsql ((GaussDB Kernel 505.2.1.SPC0800 build 85996fbb) compiled at 2025-07-03 01:15:58 commit 10558 last mr 24271 release)
SSL connection (cipher: ECDHE-RSA-AES128-GCM-SHA256, bits: 128)
Type "help" for help.
gaussdb=>
gaussdb=> \l
List of databases
Name | Owner | Encoding | Collate | Ctype | Access privileges
-----------+-------+-----------+---------+-------+-------------------
postgres | Ruby | SQL_ASCII | C | C |
template0 | Ruby | SQL_ASCII | C | C | =c/Ruby +
| | | | | Ruby=CTc/Ruby
template1 | Ruby | SQL_ASCII | C | C | =c/Ruby +
| | | | | Ruby=CTc/Ruby
templatea | Ruby | SQL_ASCII | C | C | =c/Ruby +
| | | | | Ruby=CTc/Ruby
templatem | Ruby | SQL_ASCII | C | C | =c/Ruby +
| | | | | Ruby=CTc/Ruby
(5 rows)[Ruby@gs01 cm_agent]$ gsql -d postgres -p 8000 -U sysbench -W Huawei@1234 -c "create database db_test;"
CREATE DATABASE
[Ruby@gs01 cm_agent]$[root@gs01 share]# sysbench oltp_read_write --tables=1 --table-size=5000000 --threads=8 --time=600 --db-driver=pgsql --pgsql-db=db_test --pgsql-user=sysbench --pgsql-password=Huawei@1234 --pgsql-host=192.168.3.60 --pgsql-port=8000 --report-interval=5 prepare
sysbench 1.0.17-71abd99 (using bundled LuaJIT 2.1.0-beta2)
Initializing worker threads...
FATAL: Connection to database failed: none of the server's SASL authentication mechanisms are supported
FATAL: `sysbench.cmdline.call_command' function failed: ./oltp_common.lua:88: connection creation failed
FATAL: Connection to database failed: none of the server's SASL authentication mechanisms are supported
FATAL: `sysbench.cmdline.call_command' function failed: ./oltp_common.lua:88: connection creation failed
FATAL: Connection to database failed: none of the server's SASL authentication mechanisms are supported
FATAL: `sysbench.cmdline.call_command' function failed: ./oltp_common.lua:88: connection creation failed
FATAL: Connection to database failed: none of the server's SASL authentication mechanisms are supported
FATAL: `sysbench.cmdline.call_command' function failed: ./oltp_common.lua:88: connection creation failed
FATAL: Connection to database failed: none of the server's SASL authentication mechanisms are supported
FATAL: `sysbench.cmdline.call_command' function failed: ./oltp_common.lua:88: connection creation failed
FATAL: Connection to database failed: none of the server's SASL authentication mechanisms are supported
FATAL: `sysbench.cmdline.call_command' function failed: ./oltp_common.lua:88: connection creation failed
FATAL: Connection to database failed: none of the server's SASL authentication mechanisms are supported
FATAL: `sysbench.cmdline.call_command' function failed: ./oltp_common.lua:88: connection creation failed
FATAL: Connection to database failed: none of the server's SASL authentication mechanisms are supported
FATAL: `sysbench.cmdline.call_command' function failed: ./oltp_common.lua:88: connection creation failed问题排查与处理方案
当数据初始化出现异常时,可采取如下措施:
- 查看错误信息并定位原因,常见问题如用户权限不足或连接失败。
- 删除原有sysbench用户,并重新创建以确保配置正确。
[Ruby@gs01 cm_agent]$ gs_guc reload -Z datanode -N all -I all -c "password_encryption_type=0"
The gs_guc run with the following arguments: [gs_guc -Z datanode -N all -I all -c password_encryption_type=0 reload ].
Begin to perform the total nodes: 1.
Popen count is 1, Popen success count is 1, Popen failure count is 0.
Begin to perform gs_guc for datanodes.
Command count is 1, Command success count is 1, Command failure count is 0.

Total instances: 1. Failed instances: 0.
ALL: Success to perform gs_guc!

[Ruby@gs01 cm_agent]$ gs_guc reload -Z datanode -N all -I all -h "host all all 0.0.0.0/0 md5"
The gs_guc run with the following arguments: [gs_guc -Z datanode -N all -I all -h host all all 0.0.0.0/0 md5 reload ].
Begin to perform the total nodes: 1.
Popen count is 1, Popen success count is 1, Popen failure count is 0.
Begin to perform gs_guc for datanodes.
Command count is 1, Command success count is 1, Command failure count is 0.

Total instances: 1. Failed instances: 0.
ALL: Success to perform gs_guc!
gsql -d postgres -p 8000 -r
drop database db_test;
drop user sysbench;
create database db_test;
create user sysbench with sysadmin password 'Huawei@1234';- 完成用户重建后,再次执行数据初始化流程。
[root@gs01 share]# sysbench oltp_read_write --tables=1 --table-size=5000000 --threads=8 --time=600 --db-driver=pgsql --pgsql-db=db_test --pgsql-user=sysbench --pgsql-password=Huawei@1234 --pgsql-host=192.168.3.60 --pgsql-port=8000 --report-interval=5 prepare
sysbench 1.0.17-71abd99 (using bundled LuaJIT 2.1.0-beta2)

Initializing worker threads...

Creating table 'sbtest1'...
Inserting 5000000 records into 'sbtest1'
Creating a secondary index on 'sbtest1'...
[root@gs01 share]#- 登录GaussDB数据库,检查当前参数 synchronous_commit 的设置值。
gaussdb=# show synchronous_commit;
 synchronous_commit
--------------------
 off
(1 row)- 根据测试需求,调整 synchronous_commit 参数以优化写入性能。
[Ruby@gs01 cm_agent]$ gs_guc reload -Z datanode -N all -I all -c "synchronous_commit=local"
The gs_guc run with the following arguments: [gs_guc -Z datanode -N all -I all -c synchronous_commit=local reload ].
Begin to perform the total nodes: 1.
Popen count is 1, Popen success count is 1, Popen failure count is 0.
Begin to perform gs_guc for datanodes.
Command count is 1, Command success count is 1, Command failure count is 0.

Total instances: 1. Failed instances: 0.
ALL: Success to perform gs_guc!- 手动运行环境检测脚本,确保各项服务和配置处于预期状态。
sysbench oltp_read_write --tables=1 --table-size=500000000 --threads=8 --time=600 --db-driver=pgsql --pgsql-db=db_test --pgsql-user=sysbench --pgsql-password=Huawei@1234 --pgsql-host=192.168.3.60 --pgsql-port=8000 --report-interval=5 run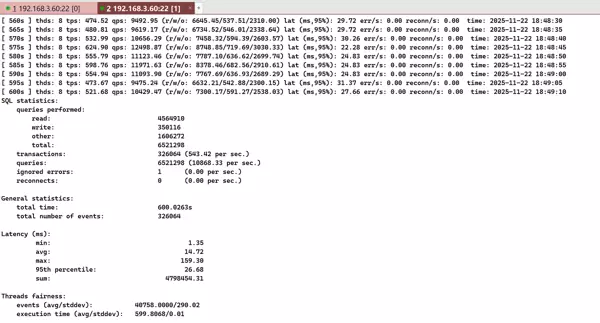
磁盘IO高负载对性能影响的模拟实验
- 运行指定脚本,模拟在常规IO负载下系统的业务表现。
sysbench oltp_read_write --tables=1 --table-size=5000000 --threads=8 --time=600 --db-driver=pgsql --pgsql-db=db_test --pgsql-user=sysbench --pgsql-password=Huawei@1234 --pgsql-host=192.168.3.60 --pgsql-port=8000 --report-interval=5 --percentile=99 run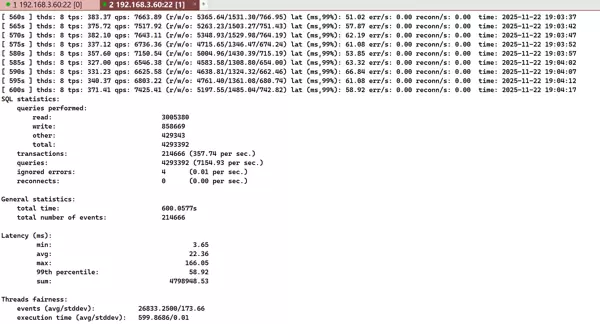
- 执行另一组脚本,人为制造数据盘高IO压力场景,模拟生产环境中可能出现的磁盘瓶颈。
touch /data/cluster/master/datanode1/test_in
touch /data/cluster/master/datanode1/test_out
dd if=/dev/zero of="/data/cluster/master/datanode1/test_in" bs=3G count=10 iflag=fullblock
while true;
do
dd if="/data/cluster/master/datanode1/test_in" of="/data/cluster/master/datanode1/test_out" bs=3G count=10 iflag=fullblock
done;- 在高IO压力持续状态下,重新启动sysbench进行压测,观察性能变化。
sysbench oltp_read_write --tables=1 --table-size=5000000 --threads=8 --time=600 --db-driver=pgsql --pgsql-db=db_test --pgsql-user=sysbench --pgsql-password=Huawei@1234 --pgsql-host=192.168.3.60 --pgsql-port=8000 --report-interval=5 --percentile=99 run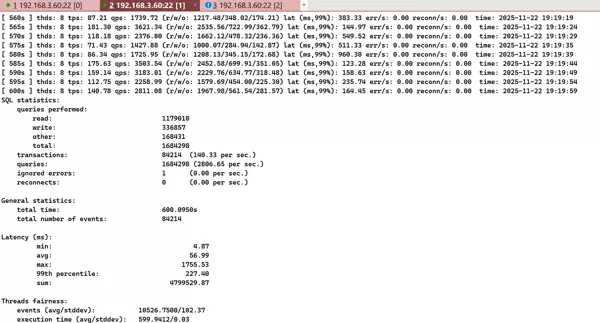
实验结果表明:在无额外IO压力的环境下,系统TPS达到357,QPS为7154;而在磁盘IO压力显著增加的情况下,TPS下降至140,QPS降至2806。由此可见,磁盘IO性能对数据库整体吞吐能力具有显著影响。

 京公网安备 11010802022788号


