


 雷达卡
雷达卡


1. 项目初始化与依赖配置
首先,新建一个由Maven进行依赖管理的Springboot项目,并引入必要的静态资源和页面模板文件。 参考资源路径:https://gitee.com/zty-f/springboot/tree/main/springboot-03-web-system/src/main/resources 导入以下两个关键依赖以支持开发:Lombok用于简化Java类的编写,Thymeleaf作为前端模板引擎。pom.xml2. 实体类定义
创建两个核心实体类:部门(Department)和员工(Employee),分别用于表示系统中的组织架构与人员信息。DepartmentEmployee3. 模拟数据访问层(Dao)实现
由于本示例暂未接入真实数据库,因此通过Dao层手动模拟数据存储与查询逻辑。 部门数据访问对象实现如下: @Repository public class DepartmentDao { private static Map
// 初始化员工数据集合,用于存储员工信息
private static Map<Integer, Employee> employees = new HashMap<Integer, Employee>();

// 模拟数据库中的部门表信息,并添加若干员工记录
employees.put(1001, new Employee(1001, "AAY", "828965@qq.com", 0, new Department(101, "教学部")));
employees.put(1002, new Employee(1002, "ABY", "852525@qq.com", 1, new Department(102, "市场部")));
employees.put(1003, new Employee(1003, "ACY", "8528965@qq.com", 0, new Department(103, "教研部")));
employees.put(1004, new Employee(1004, "ADY", "8558965@qq.com", 1, new Department(104, "运营部")));
employees.put(1005, new Employee(1005, "AEY", "8552965@qq.com", 0, new Department(105, "后勤部")));

// 主键自增值初始化
private static Integer initId = 1006;

/**
 * 添加新员工的方法
 * 若员工ID为空,则自动分配一个递增ID
 * 同时根据部门ID设置对应的部门信息
 */
public void add(Employee employee) {
    if (employee.getId() == null) {
        employee.setId(initId++);
    }
    // 通过DepartmentDao获取完整的部门对象并赋值
    employee.setDepartment(departmentDao.getDepartmentById(employee.getDepartment().getId()));
    // 将员工存入集合中
    employees.put(employee.getId(), employee);
}

/**
 * 查询所有员工信息
 * 返回员工集合的值视图
 */
public Collection<Employee> getAll() {
    return employees.values();
}

/**
 * 根据员工ID查询具体员工信息
 */
public Employee getEmployeeById(Integer id) {
    return employees.get(id);
}

/**
 * 根据员工ID删除对应员工记录
 */
public void deleteById(Integer id) {
    employees.remove(id);
}
国际化配置说明
2.1 配置文件编写流程
在项目的 resources 目录下创建名为 i18n 的子目录,专门用于存放国际化资源文件。
在该目录中新建以下三个配置文件:
login.propertieslogin_zh_CN.propertieslogin_en_US.properties
为了更高效地管理多语言资源,建议从IDE插件市场安装专用工具:
安装
Resource Bundle Editor接下来对各个配置文件设置不同的语言属性:
login.propertieslogin.btn=登录
login.password=密码
login.remember=记住我
login.tip=请登录
login.username=用户名login_zh_CN.propertieslogin.btn=登录
login.password=密码
login.remember=记住我
login.tip=请登录
login.username=用户名login_en_US.propertieslogin.btn=Sign in
login.password=Password
login.remember=Remember me
login.tip=Please sign in
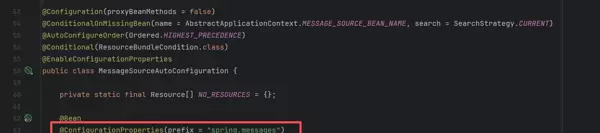
login.username=Username查找系统自动配置的消息源类文件:
MessageSourceAutoConfiguration可发现需在配置文件中使用特定前缀进行定义:
spring.messages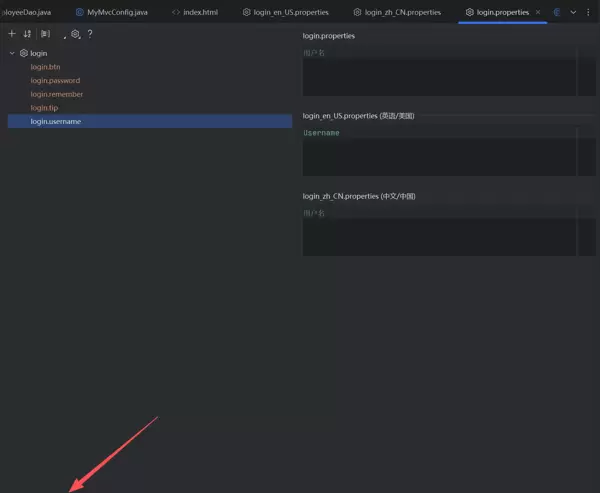
在配置文件中进行如下设置以启用国际化功能:
application.properties# 国际化配置文件存放的真实位置
spring.messages.basename=i18n.login2.2 区域解析器(LocaleResolver)配置
查看配置类源码:
WebMvcAutoConfiguration其中包含如下核心Bean定义:
@Bean
@ConditionalOnMissingBean
@ConditionalOnProperty(prefix = "spring.mvc", name = "locale")
public LocaleResolver localeResolver() {
    // 当配置为FIXED模式时,始终使用固定区域设置
    if (this.mvcProperties.getLocaleResolver() == WebMvcProperties.LocaleResolver.FIXED) {
        return new FixedLocaleResolver(this.mvcProperties.getLocale());
    }
    // 默认采用请求头中的Accept-Language进行区域解析
    AcceptHeaderLocaleResolver localeResolver = new AcceptHeaderLocaleResolver();
    localeResolver.setDefaultLocale(this.mvcProperties.getLocale());
    return localeResolver;
}
进入具体实现类查看默认的区域解析逻辑:
AcceptHeaderLocaleResolver重写方法部分如下所示:
public class MyLocaleResolver implements LocaleResolver {
    @Override
    public Locale resolveLocale(HttpServletRequest request) {
        // 获取请求中的语言参数
        String language = request.getParameter("l");
        // 默认本地化设置
        Locale locale = Locale.getDefault();

        // 若前端传递了语言参数,则进行解析
        if (!StringUtils.isEmpty(language)) {
            // 拆分语言与国家代码,如:zh_CN
            String[] parts = language.split("_");
            locale = new Locale(parts[0], parts[1]);
        }
        return locale;
    }

    @Override
    public void setLocale(HttpServletRequest request, HttpServletResponse response, Locale locale) {
        // 不实现该方法
    }
}
AcceptHeaderLocaleResolver<a class="btn btn-sm" th:href="@{/index.html(l='zh_CN')}">中文</a>
<a class="btn btn-sm" th:href="@{/index.html(l='en_US')}">English</a>
l='xx_XX'MyLocaleResolver 将会解析该请求中的 “l” 参数,并根据其值创建对应的 Locale 对象,从而实现语言环境的动态切换。
接下来,在配置类中将自定义的解析器注册到 Spring 容器中,使其生效:
@Bean
public LocaleResolver localeResolver() {
    return new MyLocaleResolver();
}
LocaleResolverMyMvcConfig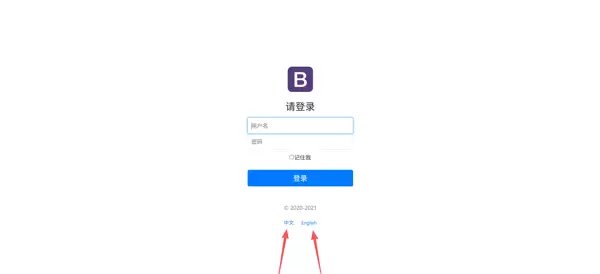
3、登录功能
3.1 基本登录功能实现
实现一个基础的登录控制逻辑,用于验证用户提交的用户名和密码信息。@Controller
public class LoginController {
@RequestMapping("/user/login")
public String login(
@RequestParam("username") String username,
@RequestParam("password") String password,
Model model) {
// 判断用户名非空且密码正确
if (!StringUtils.isEmpty(username) && "123456".equals(password)) {
// 登录成功,重定向至主页面
return "redirect:/main.html";
} else {
// 登录失败,返回错误提示
model.addAttribute("msg", "用户名或密码错误!");
return "login"; // 返回登录页显示错误信息
}
}
}
LoginControllername 属性一致)。若用户名不为空且密码为“123456”,则视为登录成功,并重定向至主界面;否则,向前端返回错误提示信息,保留在登录页面。在控制器中设置错误提示信息:
model.addAttribute("msg", "用户名或密码错误!");
return "index";
配置视图解析器,注册一个新的 ViewController,将特定请求映射到指定页面:
@Override
public void addViewControllers(ViewControllerRegistry registry) {
    // 将 /main.html 请求映射至 dashboard 页面
    registry.addViewController("/main.html").setViewName("dashboard");
}
MyMvcConfig3.2 登录拦截器实现
创建一个登录拦截器类,用于验证用户会话状态:
public class LoginHandlerInterceptor implements HandlerInterceptor {
    @Override
    public boolean preHandle(HttpServletRequest request, HttpServletResponse response, Object handler) throws Exception {
        // 检查是否存在登录用户的 Session 信息
        Object loginUser = request.getSession().getAttribute("loginUser");
        if (loginUser == null) {
            // 若无登录状态,设置提示信息并转发至首页
            request.setAttribute("msg", "没有权限,请先登录!");
            request.getRequestDispatcher("/index.html").forward(request, response);
            return false;
        } else {
            // 存在 Session,允许请求继续执行
            return true;
        }
    }
}
在配置类中注册该拦截器,并设置拦截路径规则:
@Override
public void addInterceptors(InterceptorRegistry registry) {
    registry.addInterceptor(new LoginHandlerInterceptor())
            .addPathPatterns("/**")  // 拦截所有请求
            .excludePathPatterns("/index.html", "/", "/user/login",
                                 "/css/**", "/js/**", "/img/**"); // 排除静态资源和登录相关页面
}
LoginHandlerInterceptor4 用户增删改查接口开发
4.1 员工列表展示
通过控制器方法查询全部员工数据并传递至前端视图:
@Controller
public class EmployeeController {

    @Autowired
    private EmployeeDao employeeDao;

    @RequestMapping("/emps")
    public String list(Model model) {
        Collection<Employee> employees = employeeDao.getAll();
        model.addAttribute("emps", employees);
        return "emp/list";
    }
}
4.2 添加员工信息
进入添加员工页面前,需先获取部门列表以供选择:
@GetMapping("/emp")
public String toAddPage(Model model) {
    // 查询所有部门信息
    Collection<Department> departments = departmentDao.getDepartments();
    model.addAttribute("departments", departments);
    return "emp/add";
}
处理表单提交,保存新员工信息:
@PostMapping("/emp")
public String addEmp(Employee employee) {
    System.out.println("add=>" + employee);
    employeeDao.add(employee); // 调用服务层方法完成添加操作
    return "redirect:/emps"; // 重定向避免重复提交
}
4.3 修改员工信息
跳转至修改页面,加载指定 ID 的员工原始数据:
@GetMapping("/emp/{id}")
public String toUpdateEmp(@PathVariable("id") Integer id, Model model) {
    // 根据 ID 查询员工信息
    Employee employee = employeeDao.getEmployeeById(id);
    model.addAttribute("employee", employee);
    // 同时加载部门列表以便更新时选择
    model.addAttribute("departments", departmentDao.getDepartments());
    return "emp/update";
}
model.addAttribute("emp", employee);
// 查询所有部门信息
Collection<Department> departments = departmentDao.getDepartments();
model.addAttribute("departments", departments);
return "emp/update";
@RequestMapping("/updateEmp")
public String updateEmp(Employee employee) {
employeeDao.add(employee);
return "redirect:/emps";
}
4.4 删除员工信息
// 根据ID删除员工
@GetMapping("/delEmp/{id}")
public String deleteEmp(@PathVariable("id") Integer id) {
employeeDao.deleteById(id);
return "redirect:/emps";
}
4.5 登出功能接口
@Controller
public class LoginController {
@RequestMapping("/user/logout")
public String logout(HttpSession session) {
session.invalidate();
return "redirect:/index.html";
}
}

 京公网安备 11010802022788号


